Running Create ML Style Transfer Models in an iOS Camera Application
Build an artistic camera and see how it performs on the A13 Bionic chip’s neural engine
Style transfer is a very popular deep learning task that lets you change an image’s composition by applying the visual style of another image.
From building artistic photo editors to giving a new look to your game designs through state-of-the-art themes, there are plenty of amazing things you can build with neural style transfer models. It’s also can be handy or data augmentation.
At WWDC 2020, Create ML (Apple’s model building framework) got a big boost with the inclusion of style transfer models. Though it’s shipped with the Xcode 12 update, you’ll need macOS Big Sur (in beta at the time of writing) to train style transfer models.
A First Look at Create ML’s Style Transfer
Create ML has now unlocked the potential to train style transfer models right from your MacBook. You can train both image and video style transfer convolutional neural networks, with the latter using only a limited set of convolution filters to make it optimized for real-time image processing.
To get started, you need three things:
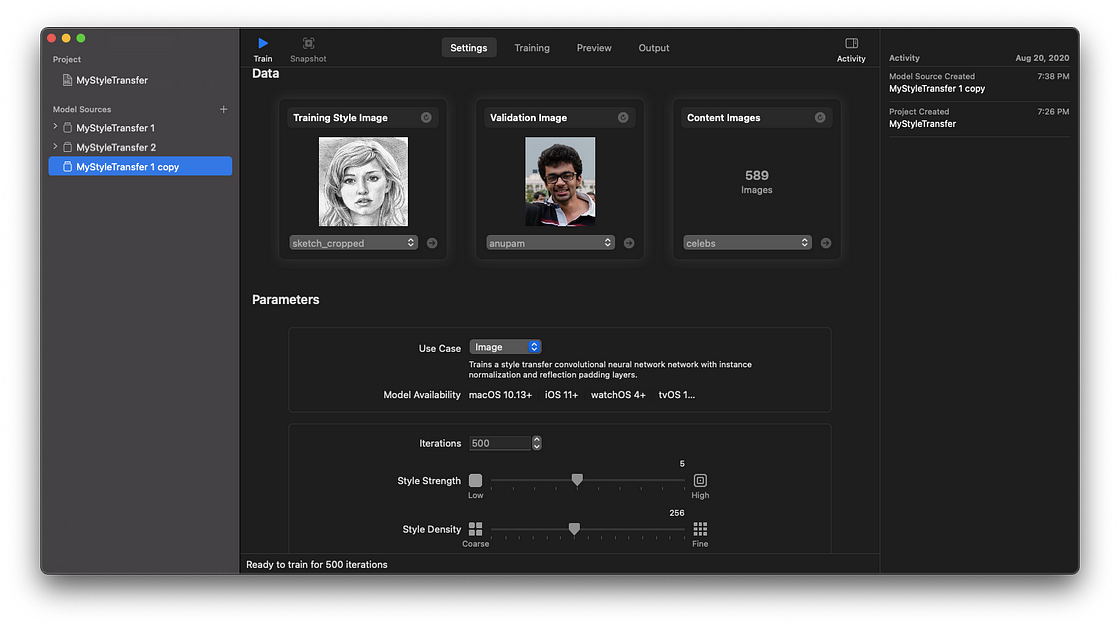
A styling image (also called a style reference image). Typically, you can use famous paintings or abstract art images to let your model learn and impart the style from. In our case, we’ll be using a pencil sketch image in our first model (check the screenshot below).
A validation image that helps visualize model quality during the training process.
Dataset of content images that act as our training data. To get optimal results, it’s best to work with a directory of images similar to ones you’d use while running inference.
In this article, I’ll be using this celebrity image dataset as our content images.
Here’s a glimpse at how my Create ML style transfer settings tab looked before training the model.
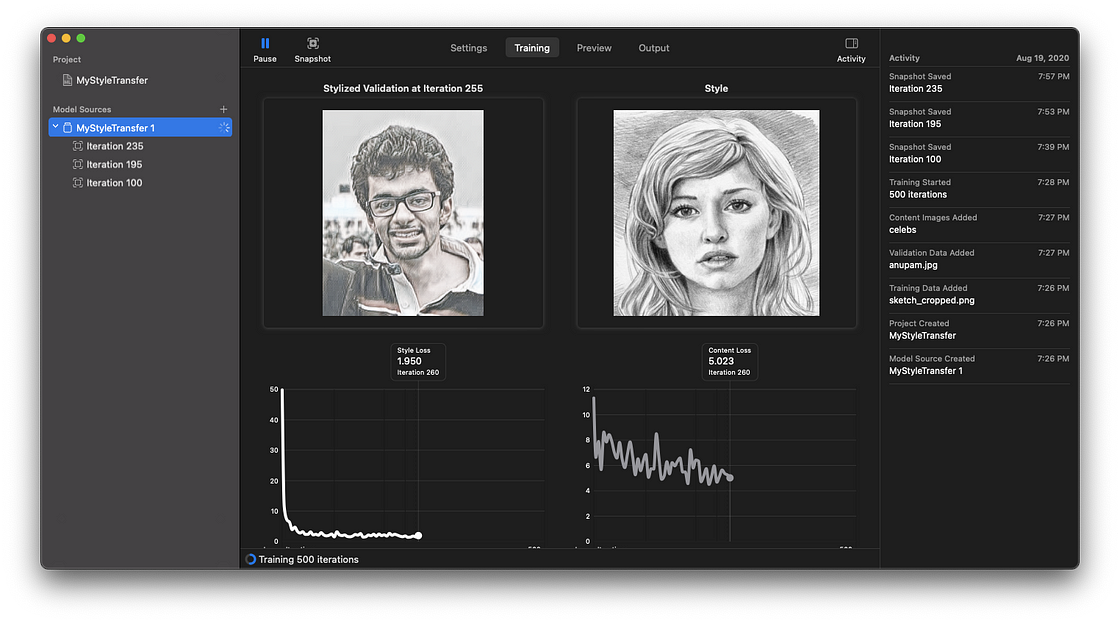
The validation image below shows real-time style transfer applied at each iteration interval. Here’s a glimpse of it:
It’s worth noting that the style loss and content loss graphs are indicators for understanding the balance between the style and content images. Typically, the style loss should decrease over time, showing that the neural network is learning to adopt the artistic traits of the style image.
While the default model parameters work great, Create ML allows us to customize them for specific use cases.
The low style strength parameter tuned only the parts of the background with the style image, thereby keeping the primary subject intact. At the same time, setting the style strength parameter to high would impart more style textures on the edges of the image.
Similarly, coarse style density uses high-level details of the style image (such models are trained much faster), whereas fine density lets the model learn minute details.
Create ML style transfer models train with a default number of iterations set to 500, which is ideal for most use cases. Iterations are the number of batches needed to complete one epoch. One epoch equals one training cycle of the entire dataset. For example, if the training dataset consists of 500 images and the batch size is 50, it indicates that 10 iterations will complete one epoch (note: Create ML model training doesn’t tell you the batch size).
This year, Create ML also introduced a new feature called model snapshots. These allow us to capture intermediate Core ML models during training and export them into your apps. However, models used from snapshots aren’t optimized for size and are significantly larger than the ones generated on training completion (specifically, the snapshots I took had Core ML model sizes in the range of 5–6 MB, whereas the final model size was 596 KB).
The following gif shows one such example, where I’ve compared model snapshot results across different iterations:
Do note how on one of the images, the style isn’t composed on the complete image. This is because the styling image used was of a smaller size. Hence, the network wasn’t able to learn enough style information, causing the composed image to be of sub-par quality.
Ideally, having a minimum size of 512 px for the style image will ensure good results.
Our Goal
In the following sections, we will build an iOS application that runs style transfer models in real-time. Here’s a bird’s eye view of our next steps:
Analyze results across three video style transfer neural network models. One of them is trained with the default parameters, and the others use the style strength parameters set as high and low.
Implement a custom camera using AVFoundation in our iOS application.
Run the generated Core ML models on a live camera feed. We’ll use a Vision request to quickly run, infer, and draw the stylized camera frames on the screen.
View the results across CPU, GPU, and Neural Engine.
Finding a style image that gives good artistic results is tricky. Luckily, I found one such image with a simple Google search.
Analyzing Style Transfer Models of Different Strengths
I’ve already trained the three models with the same dataset. Here’s are the results:
As you can see above, the low-strength model hardly impacts the content images with the given style image, but the high strength one does refine the edges with more style effects.
And with that, we have our models (roughly a half MB in size) ready to ship into our app.
Create ML also lets us preview video results, but it's incredibly slow. Luckily, we’ll see them in real-time in our demo app shortly.
AVFoundation Basics
AVFoundation is a highly-customizable Apple framework for media content. You can draw custom overlays, fine-tune the camera settings, do photo segmentation with the depth outputs, and analyze frames.
We’ll primarily focus on analyzing frames, and specifically transforming them using style transfer, and displaying them in an image view to build a live camera feed (you can also use Metal for further optimization, but for the sake of simplicity, we’ll skip that for this tutorial).
At a very basic level, building a custom camera involves the following components:
AVCaptureSession— this manages the whole session of the camera. Its functionality involves getting access to the iOS input devices and passing the data to output devices. AVCaptureSession also lets us definePresettypes for different capture sessions.AVCaptureDevice— lets us select the front or back camera. We can either pick the default settings or useAVCaptureDevice.DiscoverySessionto filter and select hardware-specific features, such as the TrueDepth or WideAngle cameras.AVCaptureDeviceInput— this provides the media source(s) from a capture device and sends it to the capture session.AVCaptureOutput— an abstract class that provides the output media to the capture session. It also lets us handle the camera orientation. We can set multiple outputs (such as for camera and microphone). For example, if you’re looking to capture photo and movies, addAVCaptureMovieFileOutputandAVCapturePhotoOutput. In our case, we’ll be usingAVCaptureVideoDataOutput, as it provides video frames for processing.AVCaptureVideoDataOutputSampleBufferDelegateis a protocol we can use to access every frame buffer inside thedidOutputdelegate method. In order to start receiving frames, we need to invoke thesetSampleBufferDelegatemethod onAVCaptureVideoDataOutputAVCaptureVideoPreviewLayer— basically aCALayerthat visually displays the live camera feed from the output of the capture session. We can transform the layer with overlays and animations. It’s important to set this for the sample buffer delegate methods to work.
Setting Up Our Custom Camera
To start off, add the NSCameraUsageDescription camera permission in your project’s info.plist file in Xcode.
Now, it’s time to create an AVCaptureSession in the ViewController.swift :
let captureSession = AVCaptureSession()
captureSession.sessionPreset = AVCaptureSession.Preset.medium
Next, we’ll filter and select the wide-angle camera from the list of available camera types present in the AVCaptureDevic instance and add it to the AVCaptureInput, which in turn is set on the AVCaptureSession:
| let availableDevices = AVCaptureDevice.DiscoverySession(deviceTypes: [.builtInWideAngleCamera], mediaType: AVMediaType.video, position: .back).devices | |
| do { | |
| if let captureDevice = availableDevices.first { | |
| captureSession.addInput(try AVCaptureDeviceInput(device: captureDevice)) | |
| } | |
| } catch { | |
| print(error.localizedDescription) | |
| } |
Now that our input is set, let's add our video output to the capture session:
let videoOutput = AVCaptureVideoDataOutput()

videoOutput.alwaysDiscardsLateVideoFrames = true

videoOutput.setSampleBufferDelegate(self, queue: DispatchQueue(label: "videoQueue"))

if captureSession.canAddOutput(videoOutput){
 captureSession.addOutput(videoOutput)
}
The alwaysDiscardsLateVideoFrames property ensures that frames that arrive late are dropped, thereby ensuring there’s less latency.
Finally, add the following piece of code to prevent a rotated camera feed:
guard let connection = videoOutput.connection(with: .video)
else { return }guard connection.isVideoOrientationSupported else { return }
connection.videoOrientation = .portrait
Note: In order to ensure all orientations, you need to set the
videoOrientationbased on the device’s current orientation. The code is available at the end of this tutorial.
Finally, we can add our preview layer and start the camera session:
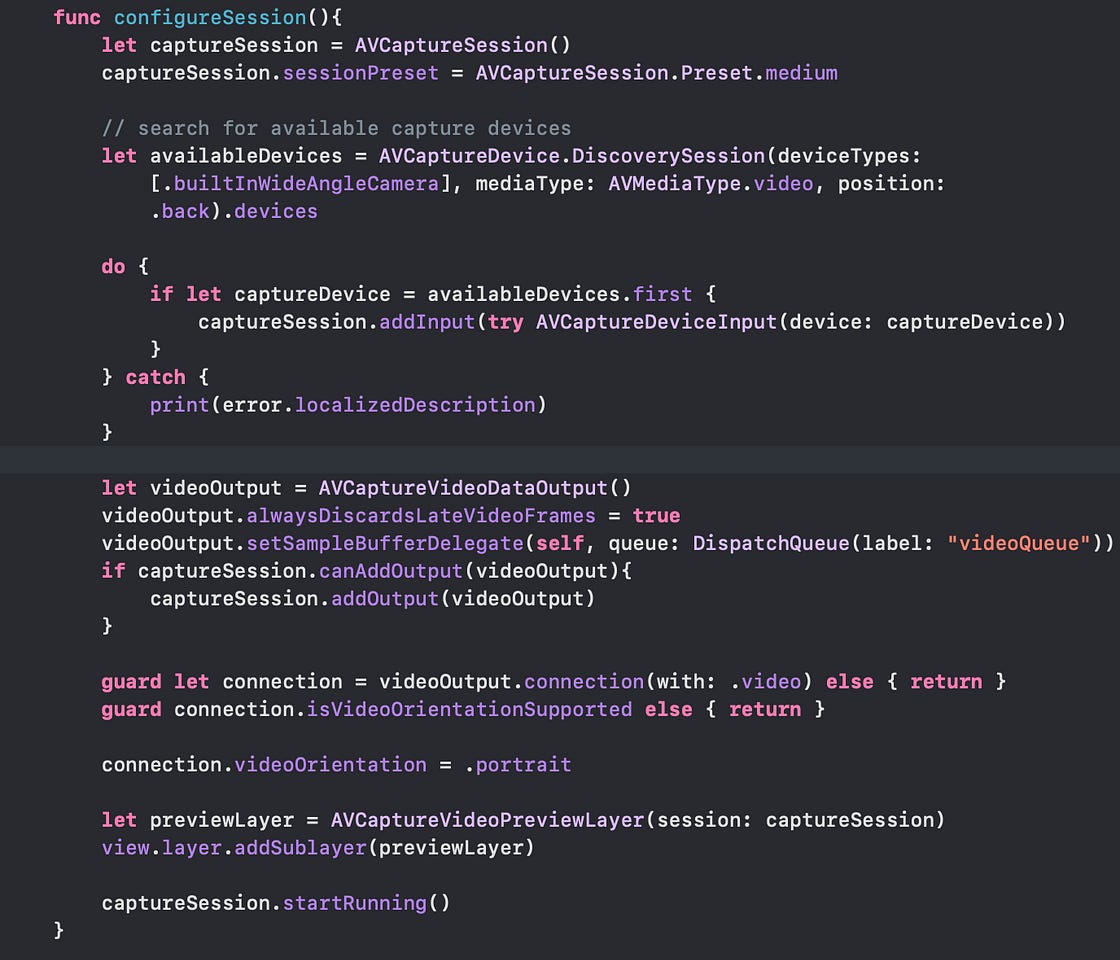
let previewLayer = AVCaptureVideoPreviewLayer(session: captureSession)view.layer.addSublayer(previewLayer)captureSession.startRunning()Here’s a look at our configureSession() method that we’ve just created:
Running Style Transfer Core ML Models in Real-Time Using Vision
Now, to the machine learning part. We’ll use the Vision framework to take care of input image pre-processing for our style transfer models.
By conforming our ViewController to the AVCaptureVideoDataOutputSampleBufferDelegate protocol, the following method can access each frame:
| extension ViewController: AVCaptureVideoDataOutputSampleBufferDelegate{ | |
| func captureOutput(_ output: AVCaptureOutput, didOutput sampleBuffer: CMSampleBuffer, from connection: AVCaptureConnection) {} | |
| } |
From the sample buffer instance above, we’ll retrieve a CVPixelBuffer instance and pass it on to the Vision request:
| guard let model = try? VNCoreMLModel(for: StyleBlue.init(configuration: config).model) else { return } | |
| let request = VNCoreMLRequest(model: model) { (finishedRequest, error) in | |
| guard let results = finishedRequest.results as? [VNPixelBufferObservation] else { return } | |
| guard let observation = results.first else { return } | |
| DispatchQueue.main.async(execute: { | |
| self.imageView.image = UIImage(pixelBuffer: observation.pixelBuffer) | |
| }) | |
| } | |
| guard let pixelBuffer: CVPixelBuffer = CMSampleBufferGetImageBuffer(sampleBuffer) else { return } | |
| try? VNImageRequestHandler(cvPixelBuffer: pixelBuffer, options: [:]).perform([request]) |
The VNCoreMLModel acts as a container, inside which we’ve instantiated our Core ML model in the following way:
StyleBlue.init(configuration: config).modelconfig is an instance of type MLModelConfiguration. It’s used to define the computeUnits property, which lets us set cpuOnly, cpuAndGpu, or all (neural engine) for running on the desired device hardware.
let config = MLModelConfiguration()switch currentModelConfig {
case 1:
config.computeUnits = .cpuOnly
case 2:
config.computeUnits = .cpuAndGPU
default:
config.computeUnits = .all}
Note: We’ve set up a
UISegmentedControlUI control that lets us switch between each of the above model configurations.
The VNCoreMLModel is passed inside the VNCoreMLRequest request, which returns observations of the type VNPixelBufferObservation.
VNPixelBufferObservation is a subclass of VNObservation that returns the image output of the CVPixelBuffer.
By using the following extension, we convert the CVPixelBuffer into a UIImage and draw it on the screen.
| extension UIImage { | |
| public convenience init?(pixelBuffer: CVPixelBuffer) { | |
| var cgImage: CGImage? | |
| VTCreateCGImageFromCVPixelBuffer(pixelBuffer, options: nil, imageOut: &cgImage) | |
| if let cgImage = cgImage { | |
| self.init(cgImage: cgImage) | |
| } else { | |
| return nil | |
| } | |
| } | |
| } |
Phew! We’ve created our real-time style transfer iOS application.
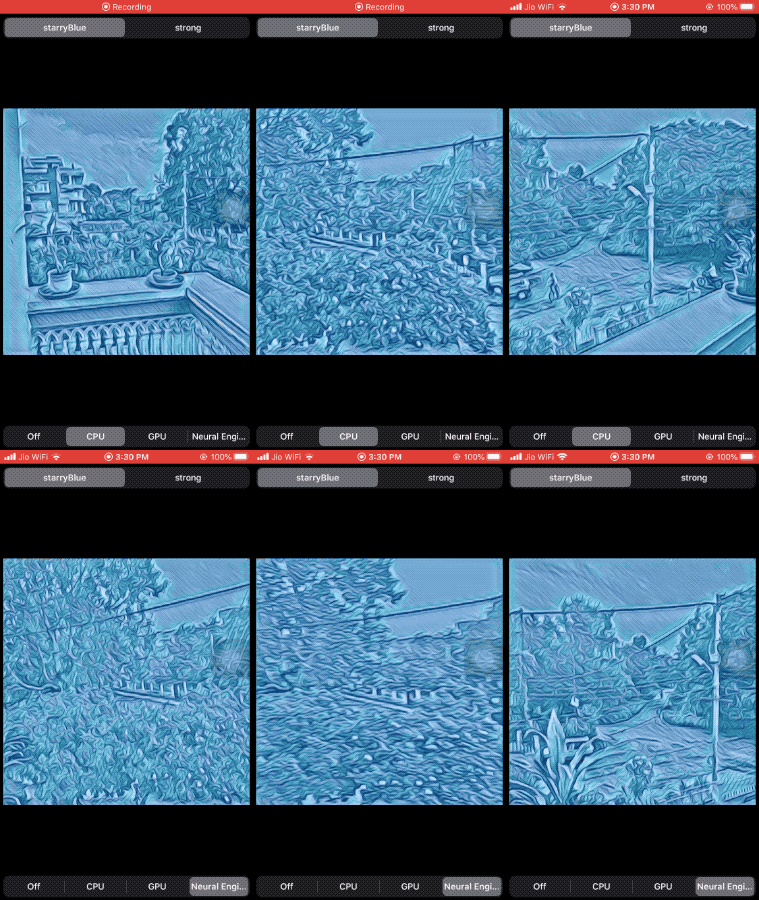
Here are the results when the application was running on an iPhone SE:
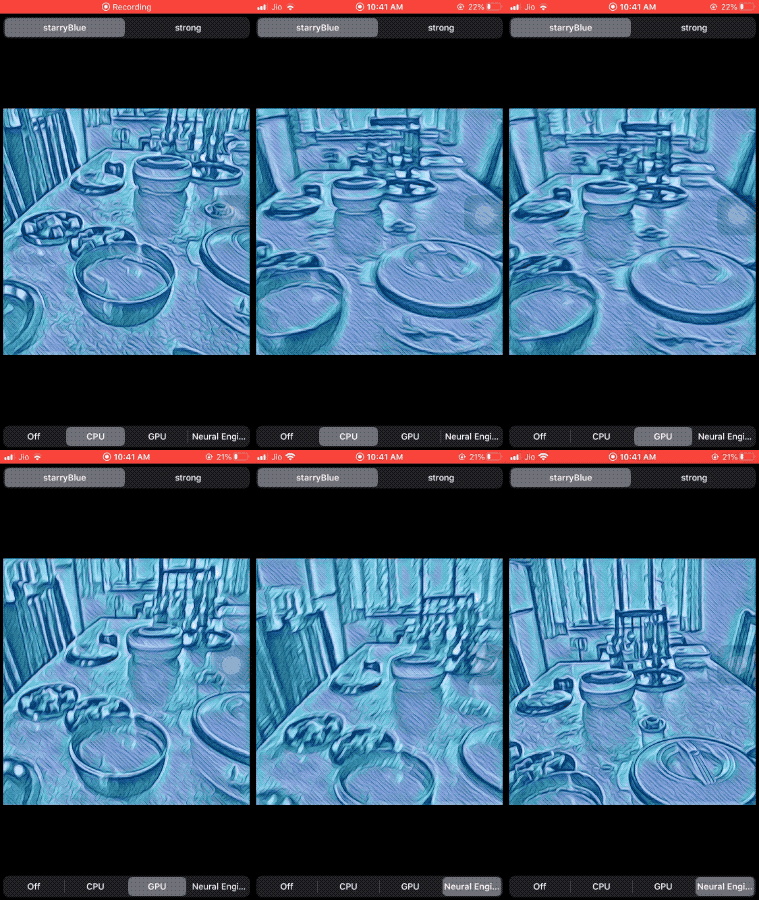
Notice, how when running on Neural Engine, style transfer predictions happen in close to real-time.
Due to gif size and quality constraints, I’ve also created a video that shows the real-time style transfer demo in action on CPU, GPU, and Neural Engine. It’s a lot smoother than the above gif.
You can find the full source code of the above application with the Core ML style transfer models in this GitHub repository.
Core ML in iOS 14 introduced model encryption, so theoretically I could protect this model. But in the spirit of learning, I’ve chosen to offer the above-created models for free.
Conclusion
The future of machine learning is clearly no-code, with platforms such as MakeML, and Apple’s Create ML leading the way and providing easy-to-use tools and platforms for quickly training mobile-ready machine learning models.
Create ML also introduced model training support for human activity classifications this year. But I believe style transfer is the one that’ll be very quickly adopted by iOS developers. In case, you wish to create a single model encompassing multiple style images, use Turi Create.
You can now build amazing AI-based, Prisma-like applications with neural style transfer neural networks at absolutely zero cost(unless you decide to upload your apps to the App Store!).
Style transfer can also be used on ARKit objects to give them a totally different look. We’ll cover that in the next tutorial. Stay tuned.
That’s it for this one. Thanks for reading.


