

iOS Cat and Dog Image Classifier With CoreML and Keras
iOS Cat and Dog Image Classifier With CoreML and Keras

Deep learning is a popular and interesting subset of Machine Learning. Deep learning brings neural networks into the limelight. Many complex tasks just as image classification, speech recognition etc can be achievable with the help of Deep Learning. We’ll be focusing on Image Classification only in this post.
I’m no Data scientist so won’t be digging deep into Deep Learning and Neural Networks.
The goal of this post is to create an image classifier model to differentiate between cats and dogs.
Technologies Used
Keras – It’s a high-level neural network API in Python with Tensorflow as its backend.
CNN Model – Convolution Neural networks are the preferred models to be used for image classification.
It starts by learning the low-level features and goes on to learn specific complex features in the deeper layers. A CNN Model takes input as a matrix
[IMAGE_WIDTH, IMAGE_HEIGHT, IMAGE_CHANNEL].Google Colabs – For training our model. It provides a free GPU!
coremltools – For converting the .h5 to .mlmodel.
Approach
We already have a small training data set for cats and dogs.
We’ve trained our model using the data on Google Colab. Our model accuracy was 70%. This isn’t that bad since the data set is small and we’d run the model on 5 epochs only. You can try to increase the number of epochs for better accuracy.
Note: One Epoch is when a complete dataset is passed forward and backward through the neural network. It’s typically based in batches.
You can find and use the data set, model, training, and prediction python scripts from the source code at the end of this article
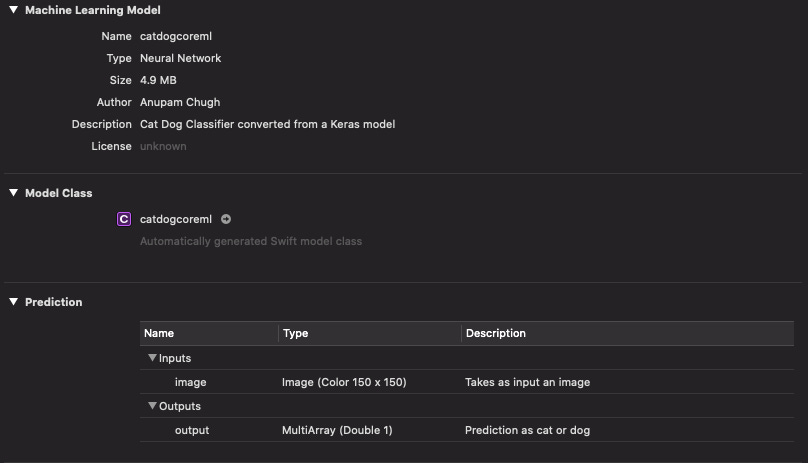
Converting Keras model to Core ML
We can easily convert the Keras model from above into .mlmodel using coremltools.
In order to install coremltools, run the following command from your terminal.
pip install coremltools
The following python script contains the code for model conversion.
| import coremltools | |
| coreml_model = coremltools.converters.keras.convert('model.h5', input_names=['image'], output_names=['output'],image_input_names='image') | |
| coreml_model.author = 'Anupam Chugh' | |
| coreml_model.short_description = 'Cat Dog Classifier converted from a Keras model' | |
| coreml_model.input_description['image'] = 'Takes as input an image' | |
| coreml_model.output_description['output'] = 'Prediction as cat or dog' | |
| coreml_model.save('catdogcoreml.mlmodel') |
Run the above python script ensuring the .h5 file is in the same folder location.
Note: At the time of writing this article, coremltools doesn’t work with Python3.
Once our Core ML model is created, it’s time to build the iOS Application!
Storyboard
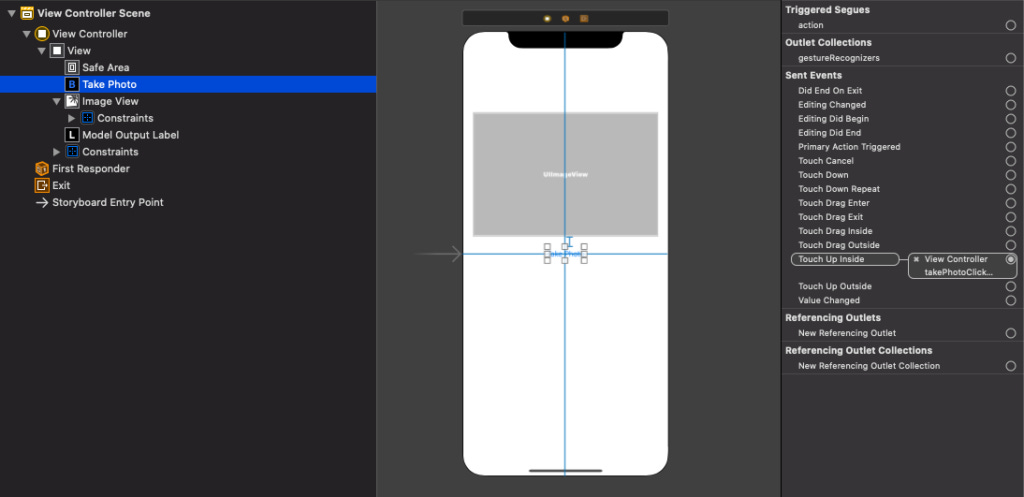
Code
Drag and drop the mlmodel we created earlier in your Project Navigator.
The Swift class files for the core ml model are auto generated.
Ensure that you’ve set the Privacy – Camera usage description field in the info.plist file.
The code for the ViewController.swift is given below:
| import UIKit | |
| import CoreML | |
| enum Animal { | |
| case cat | |
| case dog | |
| } | |
| class ViewController: UIViewController, UIImagePickerControllerDelegate, UINavigationControllerDelegate { | |
| @IBOutlet weak var modelOutputLabel: UILabel! | |
| private let model = catdogcoreml() | |
| @IBOutlet weak var imageView: UIImageView! | |
| private let trainedImageSize = CGSize(width: 150, height: 150) | |
| override func viewDidLoad() { | |
| super.viewDidLoad() | |
| // Do any additional setup after loading the view. | |
| } | |
| @IBAction func takePhotoClicked(_ sender: Any) { | |
| let imagePicker = UIImagePickerController() | |
| imagePicker.sourceType = .photoLibrary | |
| imagePicker.delegate = self | |
| present(imagePicker, animated: true, completion: nil) | |
| } | |
| func predict(image: UIImage) -> Animal? { | |
| do { | |
| if let resizedImage = resize(image: image, newSize: trainedImageSize), let pixelBuffer = resizedImage.toCVPixelBuffer() { | |
| let prediction = try model.prediction(image: pixelBuffer) | |
| let value = prediction.output[0].intValue | |
| print(value) | |
| if value == 1{ | |
| return .dog | |
| } | |
| else{ | |
| return .cat | |
| } | |
| } | |
| } catch { | |
| print("Error while doing predictions: \(error)") | |
| } | |
| return nil | |
| } | |
| func resize(image: UIImage, newSize: CGSize) -> UIImage? { | |
| UIGraphicsBeginImageContextWithOptions(newSize, false, 0.0) | |
| image.draw(in: CGRect(x: 0, y: 0, width: newSize.width, height: newSize.height)) | |
| let newImage = UIGraphicsGetImageFromCurrentImageContext() | |
| UIGraphicsEndImageContext() | |
| return newImage | |
| } | |
| func imagePickerControllerDidCancel(_ picker: UIImagePickerController) { | |
| dismiss(animated: true, completion: nil) | |
| } | |
| func imagePickerController(_ picker: UIImagePickerController, didFinishPickingMediaWithInfo info: [UIImagePickerController.InfoKey : Any]) { | |
| dismiss(animated: true) { | |
| if let image = info[UIImagePickerController.InfoKey.originalImage] as? UIImage { | |
| let animal = self.predict(image: image) | |
| self.imageView.image = image | |
| if let animal = animal{ | |
| if animal == .dog{ | |
| self.modelOutputLabel.text = "Dog" | |
| } | |
| else if animal == .cat{ | |
| self.modelOutputLabel.text = "Cat" | |
| } | |
| } | |
| else{ | |
| self.modelOutputLabel.text = "Neither dog nor cat." | |
| } | |
| } | |
| } | |
| } | |
| } | |
| extension UIImage { | |
| func toCVPixelBuffer() -> CVPixelBuffer? { | |
| let attrs = [kCVPixelBufferCGImageCompatibilityKey: kCFBooleanTrue, kCVPixelBufferCGBitmapContextCompatibilityKey: kCFBooleanTrue] as CFDictionary | |
| var pixelBuffer : CVPixelBuffer? | |
| let status = CVPixelBufferCreate(kCFAllocatorDefault, Int(self.size.width), Int(self.size.height), kCVPixelFormatType_32ARGB, attrs, &pixelBuffer) | |
| guard (status == kCVReturnSuccess) else { | |
| return nil | |
| } | |
| CVPixelBufferLockBaseAddress(pixelBuffer!, CVPixelBufferLockFlags(rawValue: 0)) | |
| let pixelData = CVPixelBufferGetBaseAddress(pixelBuffer!) | |
| let rgbColorSpace = CGColorSpaceCreateDeviceRGB() | |
| let context = CGContext(data: pixelData, width: Int(self.size.width), height: Int(self.size.height), bitsPerComponent: 8, bytesPerRow: CVPixelBufferGetBytesPerRow(pixelBuffer!), space: rgbColorSpace, bitmapInfo: CGImageAlphaInfo.noneSkipFirst.rawValue) | |
| context?.translateBy(x: 0, y: self.size.height) | |
| context?.scaleBy(x: 1.0, y: -1.0) | |
| UIGraphicsPushContext(context!) | |
| self.draw(in: CGRect(x: 0, y: 0, width: self.size.width, height: self.size.height)) | |
| UIGraphicsPopContext() | |
| CVPixelBufferUnlockBaseAddress(pixelBuffer!, CVPixelBufferLockFlags(rawValue: 0)) | |
| return pixelBuffer | |
| } | |
| } | |
In the above code, we resize the image to the size of the input for our model.
0 denotes cat and 1 denotes dog (during classification, the numbers are assigned alphabetically).
The output of the above application in action is given below:

The full source of the iOS Application and the Keras models, data sets are available here.